Exporting Step-by-Step
Export is what you do after everything in your video is complete to make it into final format for distribution.
This section will look at the process of exporting in a few simple steps.
The video you plan to export should be open in Video Detailer.
Be sure the file is saved. If it is not saved before you begin to export you will be prompted to save the file.
Open the Export function.
You can do this by clicking the Export button on the program menu at the top of the screen [ ], or by choosing Export from the main menu [ ] > Export.
Either action will open the Export screen.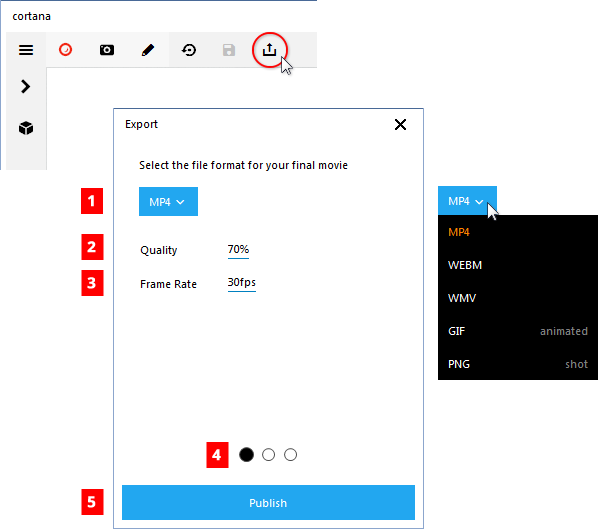
Figure 1: The initial export preference screens. Table 1: Descriptions for Export preferences.
# Name Description 1 Export Format This displays the current choice for the Export file type. Clicking the drop list reveals the export file-type options (at right in Figure 1). 2 Export Quality This defaults to 70%. It can be set to any value between 1 and 100. Click directly on the number to enter a different percentage.
NOTE: Lowering Quality will result in smaller files, but the sharpness may be compromised by compression. This option does not appear with GIF or PNG selected.3 Frame Rate This defaults to 30 fps (frames per second). It can be set to any value between 1 and 60. Click directly on the number to enter a different percentage.
NOTE: Slower fps will result in smaller files, but videos may become choppy. This option does not appear with PNG selected.4 Export Preference Screen Toggle This allows navigation of the preference screens for export.
Screen 1 is as pictured in Figure 1.
Screen 2 allows selection of dimension as pictured in Figure 2.
Screen 3 has HTML 5 player preferences Figure 3.
NOTE: HTML5 options are only available for MP4 and WEBM file types.5 Publish Button Click this after selecting all of your preferences.
Note that there are as many as two additional preference screens depending on the file type you select.[ Optional ] Click the second toggle to reveal the export dimension screen.
It is likely you will most often use the Default option, however you may need to consider other options.
To use other options choose Custom from the the drop list (see Figure 2). The options are described in Table 2.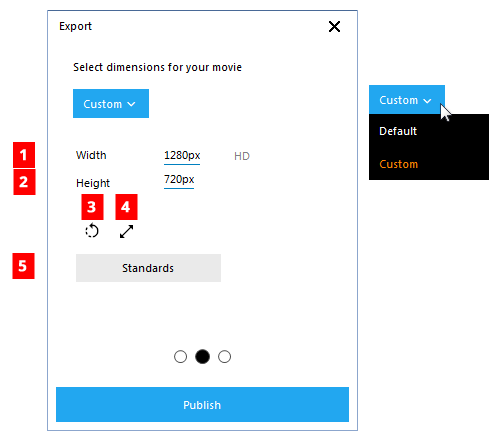
Figure 2: The Export Dimensions Custom preferences screen. Table 2: Descriptions for the Export Dimension preferences.
# Name Description 1 Width The width of the finished video. 2 Height The height of the finished video. 3 Reset Reset to the original defaults. 4 Keep Aspect Ratio Allows entry of either Height or Width and by clicking the button the previous aspect ratio will be used to calculate the second value. 5 Standards Reveals a list of standard video sizes which can be selected. [ Optional ] Click the next toggle to go to the HTML5 screen (see Figure 3).
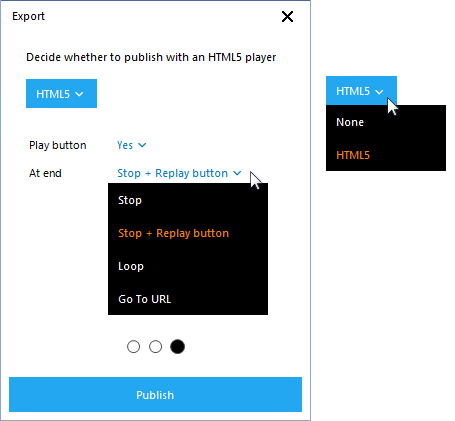
Figure 3: Export HTML5 preferences screen. Click the [Publish] button to export your file. A progress screen will appear (see Figure 4).
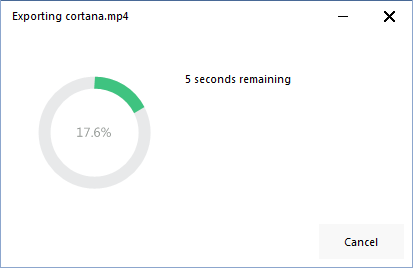
Figure 4: The export progress screen. When the video is finished being exported a success screen will appear. It includes a listing of the save directory, the files created, the duration of the movie, size of the files, the movie dimension, and buttons to Show in Explorer, Play or close the summary.
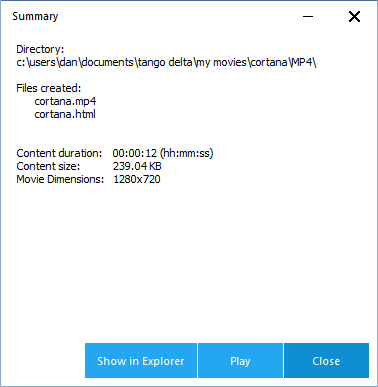
Figure 5: The Summary screen.