Adding Effects
Effects (FXs) are another way to customize objects (see Figure 1). The control panel is located at the upper right of the interface. These are graphic effects so they are not available with audio objects. Each effect has its own sub-menu that allows further customization. FXs are context sensitive so not all effects are available for all objects.
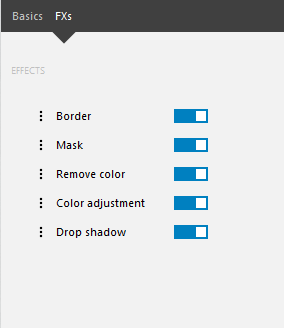
When toggled to on, clicking the pop-up menu button [ ] to the left of a given effect opens its options pop-up. These FXs pop-ups are covered in the following sections.
Effect Types
The Border FXs
Allows you to add a border to an object.
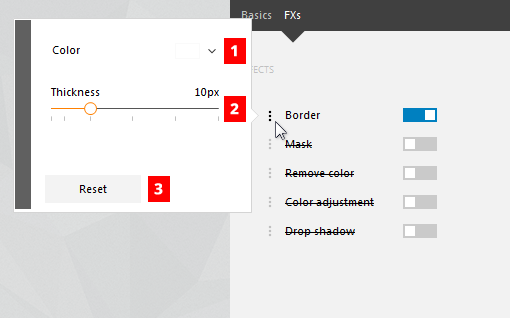
Table 1: The Border FXs pop-up control panel feature descriptions.
| # | Name | Description |
|---|---|---|
| 1 | Border Color | Click the swatch to open the Color Picker. |
| 2 | Border Thickness | Use the slider or enter a pixel value to define the thickness of the border (1 to 40 pixels). |
| 3 | Reset Button | Resets the Border FXs to the default settings. |
The Mask FXs
Adds a mask to an object to shape it (handy for inserts).
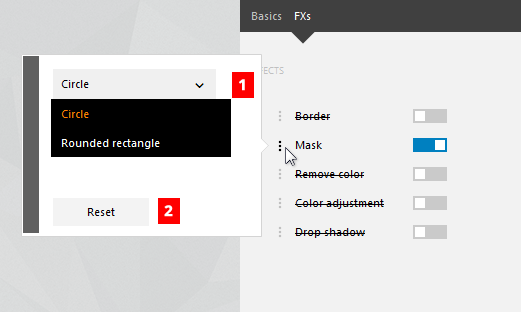
Table 2: The Mask FXs pop-up control panel feature descriptions.
| # | Name | Description |
|---|---|---|
| 1 | Mask Shape | This pop-up allows you to select a shape. The rounded rectangle option allows selection of the mask size. |
| 3 | Reset Button | Resets the Mask FXs to the default settings. |
The Remove Color FXs (Chroma Key)
This powerful tool allows you to work with chroma key effects. If you take a movie of a subject over a solid color background, you can super-impose that video on a different background. This effect is often used with a green or blue screen to help assure the success of the effect. The closer to uniform the background is, the easier the effect will be to achieve.
Video Detailer allows you to select any color to use the tool. While it is most often used with superimposition of video, it can also be used with still pictures or other image objects.
Using the Remove Color tool:
Take a video over a solid color background that you intend to superimpose on a different background.
Import the video and the background into Video Detailer.
Be sure the imported video is stacked above the background in the timeline.
Be sure the timeline indicator is over the video object .
Activate the video object by clicking on it in the timeline.
Click the FXs menu in the object control panel.
Toggle the Remove Color item to on. The pop-up menu button will become available.
Click the pop-up menu button to the left of Remove Color [ ]. This will open the Remove Color pop-up control panel.
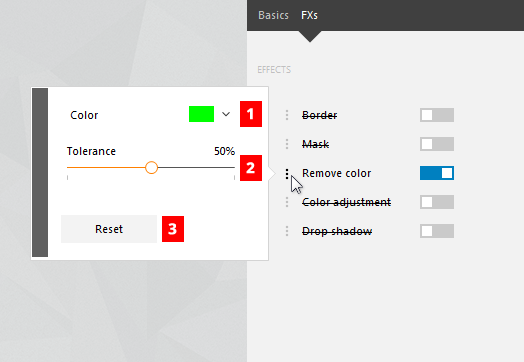
Figure 4: The Remove Color FXs pop-up control panel. Click the Color Picker menu [ ]. This will open a color palette.
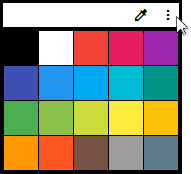
Figure 5: The Remove Color color palette. Click on the eye-dropper tool [ ].
Select the background color by clicking directly on the background color that you want to eliminate. The preview should immediately show masking off the color that you selected.
Use the Tolerance slider to adjust the effect.
Table 3: The Remove Color pop-up control panel feature descriptions, see Figure 4:
| # | Name | Description |
|---|---|---|
| 1 | Color | The color that will be masked in the current object. Click the swatch to open the Color Picker. |
| 2 | Tolerance | Allows control over the color variant that will be masked. A lower percentage will mask color closer to the range of the selected color; a higher percentage will mask a broader range of color. |
| 3 | Reset Button | Resets the Remove Color FXs to the default settings. |
The Color Adjustment FXs
Allows adjustment of brightness, contract and saturation.
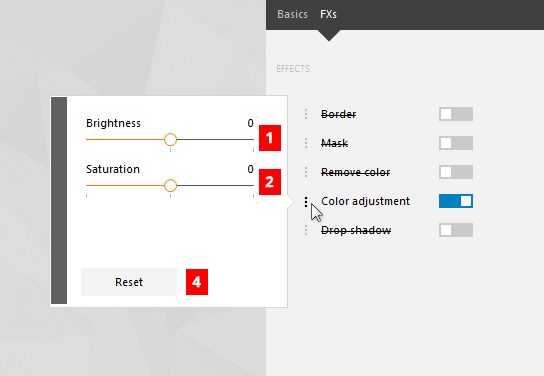
Table 4: The Color Adjustments FXs pop-up control panel feature descriptions.
| # | Name | Description |
|---|---|---|
| 1 | Brightness | Use the slider or click the number to enter a value to define the brightness (-50 to 50). |
| 2 | Contrast | Use the slider or click the number to enter a value to define the brightness (-100 to 100). |
| 3 | Saturation | [ Not Pictured ] Use the slider or click the number to enter a value to define the saturation (-100 to 100). Windows 10 only. |
| 4 | Reset Button | Resets the Color Adjustments FXs to the default settings. |
The Drop Shadow FXs
Allows addition and control of drop shadows to graphic objects.
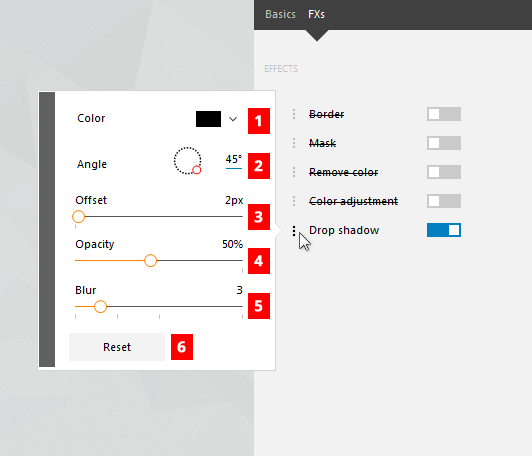
Table 5: The Drop Shadow FXs pop-up control panel feature descriptions.
| # | Name | Description |
|---|---|---|
| 1 | Shadow Color | Click the swatch to open the Color Picker. |
| 2 | Shadow Angle Control | Use the circular slider or enter a degree value to define the direction the shadow for the object falls (0 to 360 degrees). |
| 3 | Offset | Use the slider or enter a pixel value to define how far the shadow falls from the object 0 to 100 pixels). |
| 4 | Opacity | Use the slider or enter a percentage value to define the opacity of the shadow (9 to 100 percent). |
| 5 | Blur | Use the slider or enter a pixel value to define intensity of the blur (0 to 20). |
| 6 | Reset Button | Resets the Drop Shadow FXs to the default settings. |