Positioning Objects in Preview
Much of object positioning will be taken care of in the timeline by dragging and dropping them into order. Additional features for object control are found in the Preview window on the objects themselves.
To edit positioning and sizing of objects you will use the preview screen directly as well as the Basics, FXs and object-specific object control panels. To use the controls in the preview click the item you want to edit in the timeline to activate it. Figure 1 is a sample to show the controls that appear in the preview screen after activating the object (described in Table 1). You may need to slide the timeline indicator to a position over the object to reveal it.
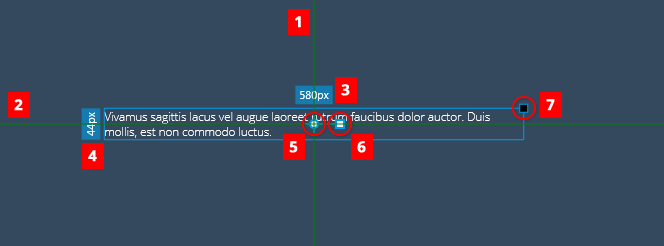
Table 1: The direct object controls.
| # | Name | Description |
|---|---|---|
| 1 | Horizontal Centering Line | This green vertical line appears when an object is dragged to the horizontal center of the image. |
| 2 | Vertical Centering Line | This green horizontal line appears when an object is dragged to the vertical center of the image. |
| 3 | Object Width | The object width in pixels. |
| 4 | Object Height | The object height in pixels. |
| 5 | Object Position Control | Clicking and dragging directly on the center dot in an active object will allow repositioning the object. |
| 6 | Rotation Control | The box immediately adjacent to the object position control allows click and drag rotation of the object. |
| 7 | Resizing Handle | These handles at the edge of the object allow click-and-drag resizing. |
The Basics object control panel should appear to the right of the interface if applicable to the object selected. This control panel, pictured in Figure 2, has controls for precise control of positioning, angle, scaling and opacity. You can also reset to default settings and add actions.
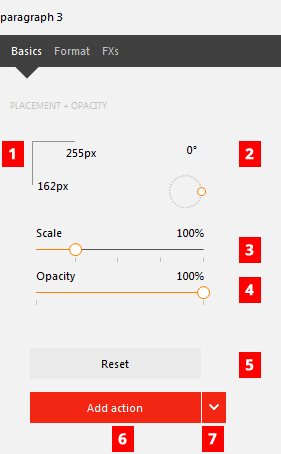
Table 1: Basics object control panel features.
| # | Name | Description |
|---|---|---|
| 1 | Position Indicator | Use this to enter exact coordinates for an object in pixels. The numbers can be changed directly by clicking and adding a value. NOTE: The measure is from the center of the object and center of the image at 0, 0. To move the object up or left, use negative numbers. |
| 2 | Angle Indicator | Use the circular slider to click and drag to add an angle to an object or click on the angle measure and enter a number in degrees. |
| 3 | Scale Slider | Position the Scale slider to change the size of the object or click on the percentage number and enter a value between 10 to 400%. |
| 4 | Opacity Slider | Position the Opacity slider to change the solidity of the object from 0 to 100%. |
| 5 | Reset | Click the [Reset] button to restore the object's default settings. |
| 6 | Add Action | This button allows you to add motion and additional effects to objects. See Adding Actions. |
| 7 | Add Pre-built Actions | This button opens a menu with several prebuilt actions to help control your objects. See Adding Actions. |