Cursors
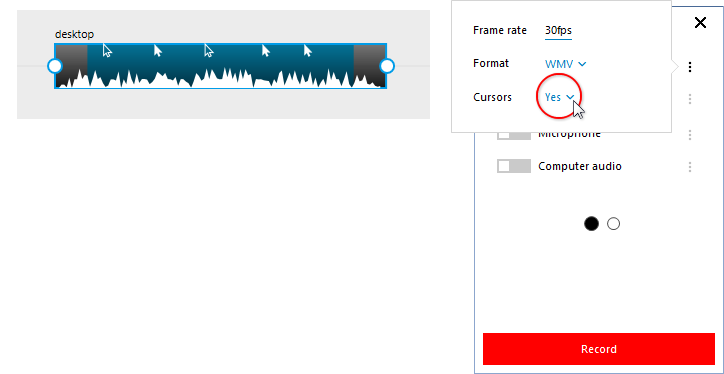
For video recordings where desktop mouse clicks matter, Video Detailer has outstanding tools. You can record your mouse movements live, and you will be able to edit the appearance after the fact. All you need to do is record your screen as you would normally (see Recording the Computer Screen), toggle on Desktop, and choose to include your cursor on the Desktop pop-up menu (toggle the Cursors option to on). Your actual mouse path and right/left clicks will be captured along with the desktop recording.
After the desktop is captured, place the timeline indicator over the recorded segment and activate the desktop object in the timeline by clicking on it. If you have done these few things successfully, the Cursors menu option will appear in the Object Control Panel. Click the menu item to reveal the controls.
SIDEBAR: Making Cursors Work
Record the desktop being sure the cursor appears in the recording
Place the timeline indicator on the newly recorded object
Activate the object in the timeline
Click the Cursors menu item in the object control panel.
Edit the cursor using the options on the menu
Edit the cursor options
The Cursor menu has many controls for helping you fine tune your presentation. See Figure 2 for the Cursors menu screen. Individual pop-ups for cursor features are described separately.
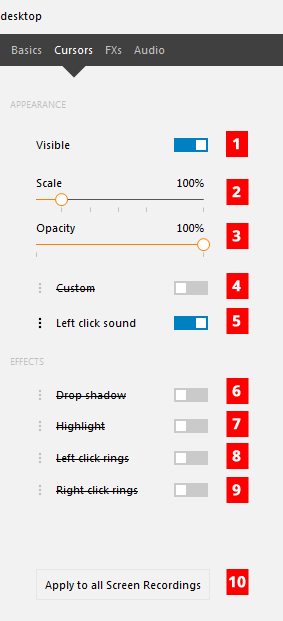
Table 1: The Cursors object control panel feature descriptions.
| # | Name | Description |
|---|---|---|
| 1 | Visible | A toggle to switch the visibility of the recorded cursor on or off. |
| 2 | Scale | Scales the cursor as a percentage. This works with your original or custom cursor and other effects. Click and drag to use the slider or click on the number and enter a percentage directly (10 to 600%). |
| 3 | Opacity | Sets the opacity of the cursor. The default is 100% opaque, but in some presentations it may be preferable to "see through" the position of the cursor. Click and drag to use the slider or click on the number and enter a percentage directly (0 to 100%). |
| 4 | Custom | Allows you to customize the appearance of the cursor using a standardized design. See the section on Custom Cursor Pop-up |
| 5 | Left-Click Sound | You can choose the sound for the click and volume. |
| 6 | Drop Shadow | Add a drop shadow to the cursor. |
| 7 | Highlight | Highlight the area of the cursor tip. |
| 8 | Left Click Rings | Displays a click event position with a colored, expanding ring. |
| 9 | Right Click Rings | Displays a click event position with a colored, expanding ring. |
| 10 | Apply to all Screen Recordings | Applies the Cursor settings to all other objects in the video with recorded cursors. |
Individual pop-ups for cursor features
Custom
Allows you to customize the appearance of the cursor using a standardized design. See the section on Custom Cursor Pop-up
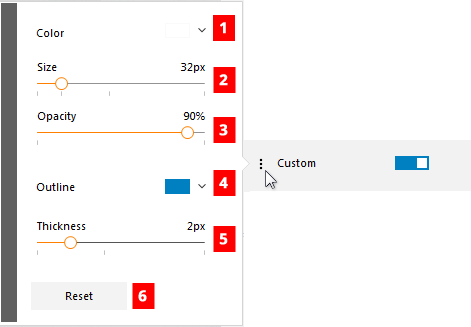
Table 2: The Cursor pop-up feature descriptions.
| # | Name | Description |
|---|---|---|
| 1 | Color | Adjust the fill color of the custom cursor using a color. |
| 2 | Size | Scales the size of the custom cursor in pixels. Click and drag to use the slider or click on the number and enter a pixel size directly (16 to 128). |
| 3 | Opacity | Sets the opacity of the cursor. Click and drag to use the slider or click on the number and enter a percentage directly (0 to 100%). |
| 4 | Outline | Allows you to customize the appearance of the cursor by changing the outline color using a color picker. |
| 5 | Thickness | Adjust the thickness of the custom cursor outline. Click and drag to use the slider or click on the number and directly entering a pixel width (0 to 10 pixels). |
| 6 | Reset | Reset the custom values to the default. |
Left Click Sound
You can choose the sound for the click and volume.
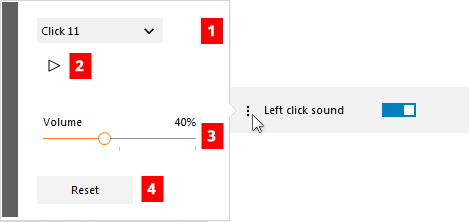
Table 3: The Cursors Left Click pop-up feature descriptions.
| # | Name | Description |
|---|---|---|
| 1 | Click | Choose from one of 26 different click sounds to play on every click event. |
| 3 | Play | Play the selected click sound. |
| 4 | Volume | Sets the volume for the click sound. Click and drag to use the slider or click on the number and enter a percentage directly (0 to 100%) |
| 5 | Reset | Reset to the default values for the click sound. |
Drop Shadow
Add a drop shadow to the cursor.
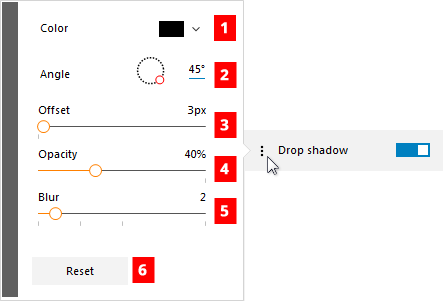
Table 4: The Cursors drop shadow feature descriptions.
| # | Name | Description |
|---|---|---|
| 1 | Color | Adjust the drop shadow color of the using a color picker. |
| 2 | Angle | Choose the angular direction the shadow will fall in relation to the cursor. Click and drag the circular slider to or click on the number and enter an angular degree directly (0 to 360). |
| 3 | Offset | Choose the distance the shadow will fall from the cursor. Click and drag to use the slider or click on the number and enter a pixel value directly (0 to 100 pixels). |
| 4 | Opacity | Choose the opacity of the shadow. Click and drag to use the slider or click on the number and enter a percentage directly (9 to 100%). |
| 5 | Blur | Choose the blur amount for the drop shadow. Click and drag to use the slider or click on the number and enter a percentage directly (0 to 20). |
| 6 | Reset | Reset the drop shadow values to the default. |
Highlight
Highlight the area of the cursor tip.
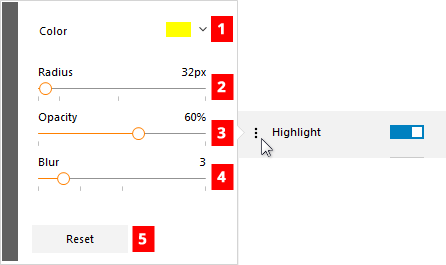
Table 5: The Cursors Highlight pop-up feature descriptions.
| # | Name | Description |
|---|---|---|
| 1 | Color | Adjust the highlight color of the cursor using a color picker. |
| 2 | Radius | Scales the size of the highlight radius. This works with your original or custom cursor and other effects. Click and drag to use the slider or click on the number and enter a percentage directly (16 to 400 pixels). |
| 3 | Opacity | Sets the opacity of the cursor. Click and drag to use the slider or click on the number and enter a percentage directly (0 to 100%). |
| 4 | Blur | Adjusts the opacity of the highlight. Click and drag to use the slider or click on the number and enter a percentage directly (0 to 20). |
| 5 | Reset | Reset the drop shadow values to the default. |
Left/Right Click Rings
Displays a click event position with a colored, expanding ring.
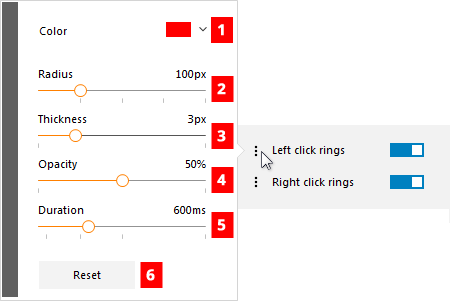
Table 6: The Cursors left/right-click ring pop-up feature descriptions.
| # | Name | Description |
|---|---|---|
| 1 | Color | Adjust the color of the left/right-click rings. |
| 2 | Radius | Adjusts the radius (final size) of the click ring. Click and drag to use the slider or click on the number and enter a percentage directly (0 to 400 pixels). |
| 3 | Thickness | Sets the thickness of the click ring. Click and drag to use the slider or click on the number and enter a percentage directly (1 to 10 pixels). |
| 4 | Opacity | Allows you to set the opacity of the click ring. Click and drag to use the slider or click on the number and enter a percentage directly (0 to 100 percent). |
| 5 | Duration | Sets the duration of the click ring. Click and drag to use the slider or click on the number and enter a percentage directly (0 to 2000 milliseconds). |
| 6 | Reset | Resets the left/right-click ring to the default settings. |